使用fsdbedit工具修改fsdb波形的层次结构
0赞verdi工具有一个很强大的功能,可以将代码和波形对应起来,这样debug效率就很高。但是这需要有一个前提,代码的信号的层次路径,要和波形里面该信号的层次路径一致,这样verdi工具才能够进行对应。
但是如果代码里面的信号层次路径,和波形里面的信号层次路径不一致,那verdi工具就无能为力了。也就不能进行代码和波形的对应。
但是有时候,会有这样的一种情况。对于同一个模块,在不同的仿真环境下,所在的层次路径是不一样的。比如对于模块D:
- 在仿真环境A中,所在的层次路径为 tb_top1.xxx.a
- 在仿真环境B中,所在的层次路径为 tb_top2.yyy.a
此时在A仿真环境中生成的fsdb波形,如果我只想看模块D的波形,那么该fsdb波形,能够在仿真环境B中查看了吗?
当然,在仿真环境B中,能够直接打开该fsdb波形,但是不能将模块D的代码和波形中模块D的波形进行对应,因为他们的层次路径不一样。
所以,这个时候,如果能直接修改fsdb波形文件的层次路径,将tb_top1.xxx.a,修改为tb_top2.yyy.a,那么就可以直接在仿真环境B中,将模块D的代码和波形中模块D的波形进行对应了。
一、fsdbedit工具
为了实现这个功能,我们需要使用 fsdbedit 工具。该工具属于verdi的子工具之一。
使用 fsdbedit -h 命令,可以查看该命令的使用方法:
Usage fsdbedit: fsdb_file_name [options]
options: [-insert configFile] [-delete configFile] [-insert_scope scope_string [-attribute attr_string]] [-delete_scope scope_string] [-add_top_analog_scope scope_name] [-rename_scope ] [-o fsdb_file_name] |
help信息中,还提供了一个例子:
examples: 1. Insert a leaf scope. %fsdbedit verilog.fsdb -insert_scope '/system/$scope(test1)' -o sig.fsdb
2. Insert a scope before another scope. %fsdbedit verilog.fsdb -insert_scope '/system/$scope(test1)/i_cpu' -o sig.fsdb
3. Delete one scope. %fsdbedit verilog.fsdb -delete_scope '/system/$scope(i_cpu)' -o sig.fsdb
4. Delete one scope and all the sub-scopes and signals. %fsdbedit verilog.fsdb -delete_scope '/system/$scope(i_cpu)/*' -o sig.fsdb
5. Insert the scope in the configuration file. %fsdbedit verilog.fsdb -insert insert.cfg -o sig.fsdb
6. Delete the scope in the configuration file. %fsdbedit verilog.fsdb -delete delete.cfg -o sig.fsdb
7. Add top scopes for Nanosim or Spice FSDB files. %fsdbedit analog_or_nanosim.fsdb -add_top_analog_scope 'aa.bb' -o sig.fsdb
8. Rename scope. %fsdbedit verilog.fsdb -rename_scope 'top/system' 'A' -o sig.fsdb |
其中的$scope(),就是需要操作的波形的层次路径。
下面,介绍一下几个常用的选项的用法:
二、-insert_scope
该选项,用于向fsdb波形中,插入指定的层次路径。
比如我之前的层级路径为 tb_top/u_my_and。
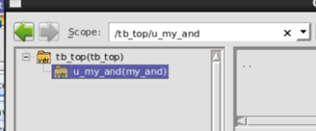
现在想在 u_my_and 层次之上,插入 xxx.yyyy 层次。
那么命令为:
fsdbedit -insert_scope '/tb_top/$scope(xxx/yyy)/u_my_and' -o a.fsdb |
此时生成的a.fsdb波形文件,层次路径如下:
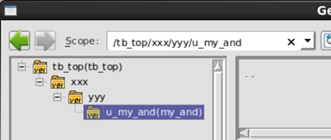
$scope(),参数指定要插入的层次路径信息,使用 / 作为层次分隔符。
三、-rename_scope
该选项,用于向fsdb波形中,重命名指定的层次路径。
比如我之前的层级路径为 tb_top/xxx/yyy/u_my_and。

现在想把 xxx,给重命名成mmm。
那么命令为:
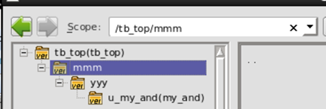
fsdbedit a.fsdb -rename_scope /tb_top/xxx' 'mmm' -o b.fsdb |
此时生成的fsdb波形中,层次路径信息如下:
四、-delete_scope
该选项,用于向fsdb波形中,删除指定的层次路径。
比如我之前的层级路径为 tb_top/xxx/yyy/u_my_and。

现在想在删除xxx层次。那么命令为:
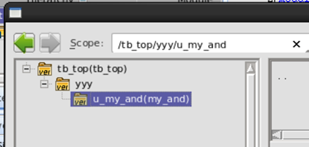
fsdbedit a.fsdb -delete_scope '/tb_top/$scope(xxx)' -o c.fsdb |
此时生成的fsdb波形中,层次路径信息如下:
五、总结
利用fsdbedit工具,可以方便的修改fsdb波形文件中的模块的层次路径信息,从而match不同的仿真环境的模块的层次路径信息,从而能够高效的利用verdi进行debug。


