从0开始学Zedboard(4)利用AXI_Timer 实现OLED自动播放
0赞
发表于 2015/1/6 下午7:58:09
阅读(8990)
在上一篇文章中,讲到用按键控制OLED显示切换,这一章我们要利用Timer和中断实现OLED显示自动播放。思路就是利用Timer倒计时之后通过中断执行一个特定的函数,SDK中我们用到了xscugic.h(PS内通用中断控制器驱动函数),xtmrctr.h(AXI_Timer驱动函数)。这两个模块配置初始化比较复杂,附件中会有Word详细讲解如何使用。
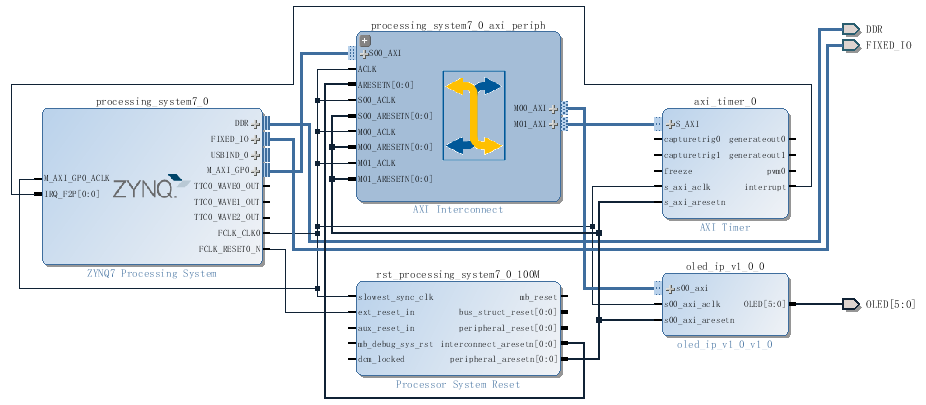
建立VIVADO工程,我在这里不详细描述,不会可以去先试试官方的demo,那里会有很多一步一步的教程,如图所示:
建立好工程后,产生bitstream,进入SDK,同样建立hellowworld,工程,将helloworld.c改为如下代码:
#include <stdio.h>
#include "platform.h"
#include "xil_types.h"
#include "xparameters.h"
#include "xgpiops.h"
#include "xil_io.h"
#include "oled.h"
#include "xil_exception.h"
#include "xscugic.h"
#include "xtmrctr.h"

#define XPAR_FABRIC_AXI_TIMER_0_INTERRUPT_INTR 61
static int InterruptFlag;
XGpioPs_Config*GpioConfigPtr;			 /* The configuration parameters of the PS GPIO */
XScuGic InterruptController;           /* Instance of the Interrupt Controller */
XTmrCtr TimerInstancePtr;              /* Instance of the AXI Timer */
static XScuGic_Config *GicConfig;      /* The configuration parameters of the Interrupt controller */
static XGpioPs psGpioInstancePtr;      /* Instance of the PS GPIO */

//计时器中断执行函数
void Timer_InterruptHandler(void *data, u8 TmrCtrNumber)
{
  print("\r\n");
  print("\r\n");
  print("@@@@@@@@@@@@@@@@@@@@@@@@@@@@@\r\n");
  print(" Inside Timer ISR \n \r ");
  XTmrCtr_Stop(data,TmrCtrNumber);
  XTmrCtr_Reset(data,TmrCtrNumber);
  print(" Timer ISR Exit\n \n \r");
  print("@@@@@@@@@@@@@@@@@@@@@@@@@@@@@\r\n");
  print("\r\n");
  print("\r\n");
  InterruptFlag = 1;
}
//GIC设置函数
int SetUpInterruptSystem(XScuGic *XScuGicInstancePtr)
{
  /*
   * Connect the interrupt controller interrupt handler to the hardware
   * interrupt handling logic in the ARM processor.
   */
  Xil_ExceptionRegisterHandler(XIL_EXCEPTION_ID_INT,
      (Xil_ExceptionHandler) XScuGic_InterruptHandler,
      XScuGicInstancePtr);
  /*
   * Enable interrupts in the ARM
   * Enable the IRQ exception
   */
  Xil_ExceptionEnable();
  return XST_SUCCESS;
}
//////////////////定义初始化中断控制器函数////////////////////////////////////
///////中断设置查找->GIC初始化->设置中断系统->中断服务程序入口地址设置->GIC允许//////

int ScuGicInterrupt_Init(u16 DeviceId,XTmrCtr *TimerInstancePtr)
{
  int Status;
  /*
   * Initialize the interrupt controller driver so that it is ready to
   * use.
   */
  GicConfig = XScuGic_LookupConfig(DeviceId);
  if (NULL == GicConfig) {
    return XST_FAILURE;
  }
  Status = XScuGic_CfgInitialize(&InterruptController, GicConfig,
      GicConfig->CpuBaseAddress);
  if (Status != XST_SUCCESS) {
    return XST_FAILURE;
  }
  /*
   * Setup the Interrupt System
   */
  Status = SetUpInterruptSystem(&InterruptController);
  if (Status != XST_SUCCESS) {
    return XST_FAILURE;
  }
  /*
   * Connect a device driver handler that will be called when an
   * interrupt for the device occurs, the device driver handler performs
   * the specific interrupt processing for the device
   */
  Status = XScuGic_Connect(&InterruptController,
      XPAR_FABRIC_AXI_TIMER_0_INTERRUPT_INTR,
      (Xil_ExceptionHandler)XTmrCtr_InterruptHandler,
      (void *)TimerInstancePtr);
  if (Status != XST_SUCCESS) {
    return XST_FAILURE;
  }
  /*
   * Enable the interrupt for the device and then cause (simulate) an
   * interrupt so the handlers will be called
   */
  XScuGic_Enable(&InterruptController, XPAR_FABRIC_AXI_TIMER_0_INTERRUPT_INTR);
  return XST_SUCCESS;
}
extern XGpioPs_Config XGpioPs_ConfigTable[XPAR_XGPIOPS_NUM_INSTANCES];
int main()
{
  int xStatus,start,end;
  u32 Readstatus1,Readstatus2;
  int iPinNumberld9 = 7;  /*Ld9 is connected to MIO pin 7*/
  int iPinNumberbtn8 = 50;/*Btn8 is connected to MIO pin 50*/
  int iPinNumberbtn9 = 51;/*Btn9 is connected to MIO pin 51*/
  init_platform();
  print("##### Application Starts #####\n\r");
  print("\r\n");
  //~~~~~~~~~~~~~~~~~~~~~~~~~~~~~~~~~~~~~~~~~~~~~~~~~~~~~~~~~~~~~~~~~~~~~~~~~~~
  //Step-1 :PS GPIO Intialization
  //~~~~~~~~~~~~~~~~~~~~~~~~~~~~~~~~~~~~~~~~~~~~~~~~~~~~~~~~~~~~~~~~~~~~~~~~~~~
  GpioConfigPtr = XGpioPs_LookupConfig(XPAR_PS7_GPIO_0_DEVICE_ID);
  if(GpioConfigPtr == NULL)
    return XST_FAILURE;
  xStatus = XGpioPs_CfgInitialize(&psGpioInstancePtr,
      GpioConfigPtr,
      GpioConfigPtr->BaseAddr);
  if(XST_SUCCESS != xStatus)
    print(" PS GPIO INIT FAILED \n\r");
  //~~~~~~~~~~~~~~~~~~~~~~~~~~~~~~~~~~~~~~~~~~~~~~~~~~~~~~~~~~~~~~~~~~~~~~~~~~~
  //Step-2 :PS GPIO pin setting to Output
  //~~~~~~~~~~~~~~~~~~~~~~~~~~~~~~~~~~~~~~~~~~~~~~~~~~~~~~~~~~~~~~~~~~~~~~~~~~~
  XGpioPs_SetDirectionPin(&psGpioInstancePtr, iPinNumberld9,1);
  XGpioPs_SetOutputEnablePin(&psGpioInstancePtr, iPinNumberld9,1);
  XGpioPs_SetDirectionPin(&psGpioInstancePtr, iPinNumberbtn8,0);
  XGpioPs_SetOutputEnablePin(&psGpioInstancePtr, iPinNumberbtn8,1);
  XGpioPs_SetDirectionPin(&psGpioInstancePtr, iPinNumberbtn9,0);
  XGpioPs_SetOutputEnablePin(&psGpioInstancePtr, iPinNumberbtn9,1);
  //~~~~~~~~~~~~~~~~~~~~~~~~~~~~~~~~~~~~~~~~~~~~~~~~~~~~~~~~~~~~~~~~~~~~~~~~~~~
  //Step-3 :AXI_Timer Intialization
  //~~~~~~~~~~~~~~~~~~~~~~~~~~~~~~~~~~~~~~~~~~~~~~~~~~~~~~~~~~~~~~~~~~~~~~~~~~~
  xStatus = XTmrCtr_Initialize(&TimerInstancePtr,XPAR_AXI_TIMER_0_DEVICE_ID);
  if(XST_SUCCESS != xStatus)
	  print("TIMER INIT FAILED \n\r");
  //~~~~~~~~~~~~~~~~~~~~~~~~~~~~~~~~~~~~~~~~~~~~~~~~~~~~~~~~~~~~~~~~~~~~~~~~~~~
  //Step-4 :Set Timer Handler
  //~~~~~~~~~~~~~~~~~~~~~~~~~~~~~~~~~~~~~~~~~~~~~~~~~~~~~~~~~~~~~~~~~~~~~~~~~~~
  XTmrCtr_SetHandler(&TimerInstancePtr,
      Timer_InterruptHandler,
      &TimerInstancePtr);
  //~~~~~~~~~~~~~~~~~~~~~~~~~~~~~~~~~~~~~~~~~~~~~~~~~~~~~~~~~~~~~~~~~~~~~~~~~~~
  //Step-5 :Setting timer Reset Value
  //~~~~~~~~~~~~~~~~~~~~~~~~~~~~~~~~~~~~~~~~~~~~~~~~~~~~~~~~~~~~~~~~~~~~~~~~~~~
  XTmrCtr_SetResetValue(&TimerInstancePtr,
      0, //Change with generic value
      0xfffff000);//6s
  //~~~~~~~~~~~~~~~~~~~~~~~~~~~~~~~~~~~~~~~~~~~~~~~~~~~~~~~~~~~~~~~~~~~~~~~~~~~
  //Step-6 :Setting timer Option (Interrupt Mode And Auto Reload )
  //~~~~~~~~~~~~~~~~~~~~~~~~~~~~~~~~~~~~~~~~~~~~~~~~~~~~~~~~~~~~~~~~~~~~~~~~~~~
  XTmrCtr_SetOptions(&TimerInstancePtr,
      XPAR_AXI_TIMER_0_DEVICE_ID,
      (XTC_INT_MODE_OPTION | XTC_AUTO_RELOAD_OPTION ));
  //~~~~~~~~~~~~~~~~~~~~~~~~~~~~~~~~~~~~~~~~~~~~~~~~~~~~~~~~~~~~~~~~~~~~~~~~~~~
  //Step-7 : SCUGIC interrupt controller Initialization
  //Registration of the Timer ISR
  //~~~~~~~~~~~~~~~~~~~~~~~~~~~~~~~~~~~~~~~~~~~~~~~~~~~~~~~~~~~~~~~~~~~~~~~~~~~
  xStatus=
      ScuGicInterrupt_Init(XPAR_PS7_SCUGIC_0_DEVICE_ID,&TimerInstancePtr);
  if(XST_SUCCESS != xStatus)
	  print(" :( SCUGIC INIT FAILED \n\r");
  //~~~~~~~~~~~~~~~~~~~~~~~~~~~~~~~~~~~~~~~~~~~~~~~~~~~~~~~~~~~~~~~~~~~~~~~~~~~
  //Step-8 :OLED Intialization
  //~~~~~~~~~~~~~~~~~~~~~~~~~~~~~~~~~~~~~~~~~~~~~~~~~~~~~~~~~~~~~~~~~~~~~~~~~~~
  OLED_Init();
  OLED_ShowString(0,0, "BTN8 to start");
  OLED_Refresh_Gram();
  //~~~~~~~~~~~~~~~~~~~~~~~~~~~~~~~~~~~~~~~~~~~~~~~~~~~~~~~~~~~~~~~~~~~~~~~~~~~
  //Step-9 :press btn8 to start
  //~~~~~~~~~~~~~~~~~~~~~~~~~~~~~~~~~~~~~~~~~~~~~~~~~~~~~~~~~~~~~~~~~~~~~~~~~~~
  while (1){
	 start=XGpioPs_ReadPin(&psGpioInstancePtr, iPinNumberbtn8);
	 if(start){
		 XGpioPs_WritePin(&psGpioInstancePtr,iPinNumberld9,1);
		 OLED_Clear();
		 OLED_ShowString(0,0, "PIG");
		 OLED_Refresh_Gram();
		 print("###################### Demo Starts ########################\r\n");
		 break;
     }
  }
  //~~~~~~~~~~~~~~~~~~~~~~~~~~~~~~~~~~~~~~~~~~~~~~~~~~~~~~~~~~~~~~~~~~~~~~~~~~~
  //Step-10 :press btn9 to end Demo
  //~~~~~~~~~~~~~~~~~~~~~~~~~~~~~~~~~~~~~~~~~~~~~~~~~~~~~~~~~~~~~~~~~~~~~~~~~~~
  while(1){
	  int high=16;
	  int lenth=80;
	  int i,j;
	  for(i=0,j=0;i<lenth,j<high;i+=5,j++){
		   if(i<lenth&&j<high){
			   XTmrCtr_Start(&TimerInstancePtr,0);
			   print("timer start \n\r");
			   //Wait For interrupt;
			   print(" \r\n");
			   while(InterruptFlag != 1);
			   InterruptFlag = 0;
			   OLED_Clear();
			   OLED_ShowString(i,j, "PIG");
			   OLED_Refresh_Gram();

		   }
	  }
	  for(i=lenth,j=high;i>0,j>0;i-=5,j--){
	  		   if(i>0&&j>0){
	  			   XTmrCtr_Start(&TimerInstancePtr,0);
	  			   print("timer start \n\r");
	  			   //Wait For interrupt;
	  			   print(" \r\n");
	  			   while(InterruptFlag != 1);
	  			   InterruptFlag = 0;
	  			   OLED_Clear();
	  			   OLED_ShowString(i,j, "PIG");
	  			   OLED_Refresh_Gram();

	  		   }
	  	  }
	  end=XGpioPs_ReadPin(&psGpioInstancePtr, iPinNumberbtn9);
	  if(end){
		  XGpioPs_WritePin(&psGpioInstancePtr,iPinNumberld9,0);
	   	  OLED_Clear();
	   	  break;
	  }
  }

  print("\r\n");
  print("***********\r\n");
  print("BYE \r\n");
  print("***********\r\n");
  cleanup_platform();
  return 0;
}
跟上一章一样,在工程里插入oled.h、oled.c、font.h。上zedboard跑的结果就是,一个PIG字符在oled屏幕里对角线不停的来回撞,知道按下BTN9结束Demo。

